A story of solar — adding PV to a low-cost Passive House
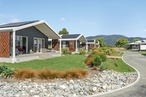
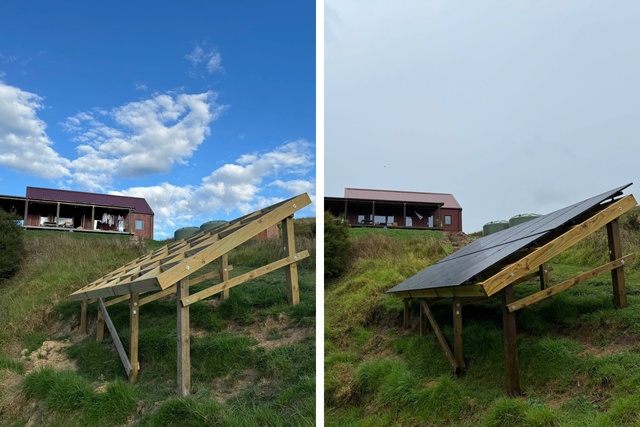
The ground-mounted solar panels installed on site at Lower Saddle Passive House, overlooking the settlement of Tahekeroa.
Architect Joe Lyth of WEL Architecture has spent the past few years ‘walking the walk’ as well as ‘talking the talk’ around healthier, lower-energy buildings. Here, he walks us through the decisions made towards renewable energy and resilience, by adding solar PV to his Passive House certified and 10 Homestar-rated home, north of Auckland.
When designing our Lower Saddle Passive House project, the addition of solar power generation was high on my list, however as it was outside of our tight budget it was relegated to a note on the drawings to ‘allow for future connection’. Three years later, we are now hooked up with a new 5.1kW solar system from Lightforce Solar, and considering this leap, I thought it might be useful to tell our story.
Since completing the project I’ve been monitoring our power use to gauge how the house was performing and more accurately size any on-site generation. The home is Passive House Certified and Homestar v5 10* rated, which means the energy required to run it is significantly less than a standard house. It is also totally electrified, with a heat pump, hot water cylinder, and induction cooking — no gas, no wood-burning stove, no other energy sources.
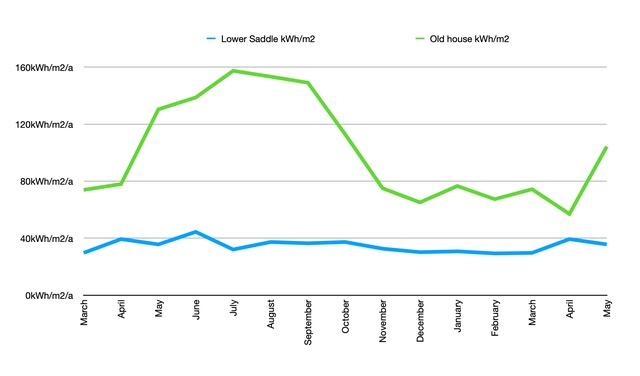
Over the past three years, the average energy use has been 382kWh/month, which is only 37.1kWh/m2/year for our 124m2 TFA home where our average power bill was $140.31 per month. The house has been comfortable year-round, with a small electric fan heater bought out for a couple of days in winter, and a fan in the bedrooms in summer for air movement and comfort.
To put this in comparison, our old minimum code rental was only slightly more energy use, 448kWh/month, and average bills of $152.88/month, but the house was only 53m2 TFA, 57% smaller, and the energy use was over 100kWh/m2/year (170% higher); the house was also extremely uncomfortable and unhealthy year round, despite trying to heat, ventilate and cool it.
Why solar?
With such low energy use and low bills in our new home I questioned whether getting solar panels was worth it. I felt sure that the financial return would take years to work out, not to mention solar energy’s historically high embodied carbon due to manufacture and end-of-life options. With so much to consider, committing to solar power was delayed until circumstances would prompt a reapproach.
In recent years we’ve had more than our fair share of power cuts, and the January 2023 cyclone left us without power and trapped at home for five days, due to flooding and fallen trees. With our changing climate these sorts of events will likely occur more frequently, and while we could have bought a generator for these times they still need fuel, so a more long-term and robust solution was required, and I began looking again at solar options.
Sizing the system
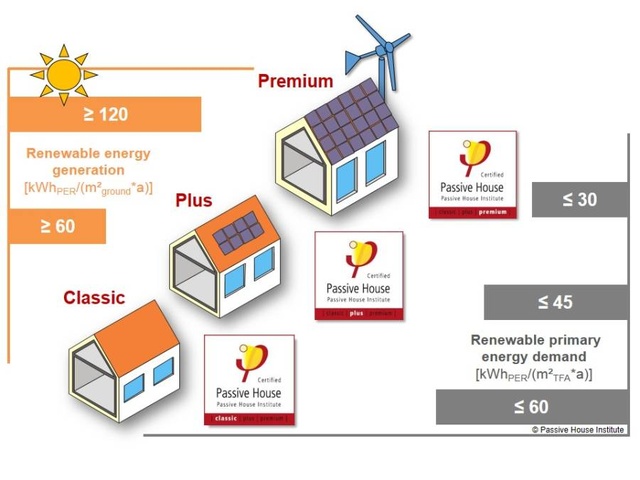
Passive House Certification has three levels: Classic, Plus and Premium. On top of the energy use, overheating and other metrics needed to achieve Classic, to achieve Plus you need to generate enough power on site to cover all of the building’s energy use — ‘honest net zero’ as it’s been called. To achieve Premium you need to generate even more energy than you use on-site, so it can be sent back to the grid to be used elsewhere.
This means that the energy model used for Passive House can size a solar system for the house and ensure that it will meet the required demand. I also had nearly three years’ worth of data that showed the assumptions in PHPP were pretty accurate — an assumption of 38.7kWh/m2/year in PHPP based on an occupancy of five people, compared to 37.1kWh/m2/year actual use with two adults and three small children; so could use this to explore different system sizes, orientations and products. I could also use it to explore future energy use — what if we could replace our battered old cars with PHEVs at some point?
Siting the system
Rooftop solar is growing in popularity in New Zealand. It means you can add power generation on-site no matter how big your section is, as the only space it takes is on the roof. However, for solar panels to produce the optimum amount of power generation, they need to face the sun and be at the right angle to capture the rays. There are moving racks that allow the panels to follow the sun, but these were way outside of our budget and not too easy to mount on a roof, so if your roof isn’t facing north, or isn’t the optimum angle for your location you will still generate power, just not as much.
For our project, we do have some north-facing roof, but it’s only at a 5-degree slope, whereas the best angle for our location is 30 degrees, so we would’ve needed racks that would have covered some windows. We do have more east- and west-facing roof at 35 degrees, but utilising PHPP I could see that our generation would be limited due to the orientation. There are also a few issues related to rooftop installs:
- I’m not particularly keen on putting holes in my roof, and while rooftop solar racks will likely be installed well, they will add risk for leaks.
- To keep solar panels at their optimum generation capacity, they also need to be kept clean. If your panels are on your roof this could be a complicated task.
- Solar panels are able to generate more if they’re kept cool — much like a computer fan works to keep the electrics cool. Having the panels on a hot metal roof, with only a few inches of air movement around them will likely reduce their output.
To remove these issues the best option is for ground-mounted solar panel arrays. This means you can get to the panels to clean and maintain them, there will be more air movement to the panels will be kept cooler; and no holes in your roof! We’re very lucky to live on a section that has room for us to do this, and I earmarked a north-facing, 30ish degree slope with minimal shading and aesthetic impact, for our installation. The location was about 30 metres from the house so would require some cable trenching, but I had a sharp spade and good intentions.
Sourcing the system
During this process I had been talking to several solar installers in the area, and after some dead ends with others, settled on Lightforce. Lightforce’s energy consultant Aaron Holmes talked us through its offerings in a video call, input the location into their software, and talked through all of the install options.
While there are lots of new technologies out there, the solar industry is changing at a remarkable rate. Currently there are three main types of solar energy systems, each with positives and negatives:
First, there is a grid-tied, panel-only system. This enables you to generate power when the sun is out, the house uses what it needs and the rest is sold back to the grid. They are the most cost-effective, but when the sun goes down any additional power use is bought from the grid, and if you have a power cut you will not be able to use your solar system at all.
The next type is a grid-tied hybrid system. This adds a hybrid inverter and a battery, which will store any power you generate but don’t use during the day, which can then be used at night. This hybrid system increases the likelihood that you won’t need to buy anything from the grid, but the option is there if needed, and any extra power you generate you can sell back. In a power outage you will still generate power and have the power in the battery, however most batteries can only store enough power for a day or so, and you will be limited by the capacity of the inverter as to what you can power at the same time — fridge, freezer, lights and internet probably — PlayStation and massage chair probably not.
You must also consider the power use of specific things. We are off-grid for water for example which is supplied to the house with a pump. The pump has quite a large power draw to start up, so any battery needs to have a large enough capacity to cover this. Batteries are expensive, as are hybrid inverters, adding around $15,000+ to a system.
Finally, you have totally off grid. This is where the system will need carefully sizing to ensure it will cover all of your power usage, and it will need far larger batteries and cost. If you don’t have enough sun, you won’t have enough power, and if you generate more than your batteries can hold it’s gone.
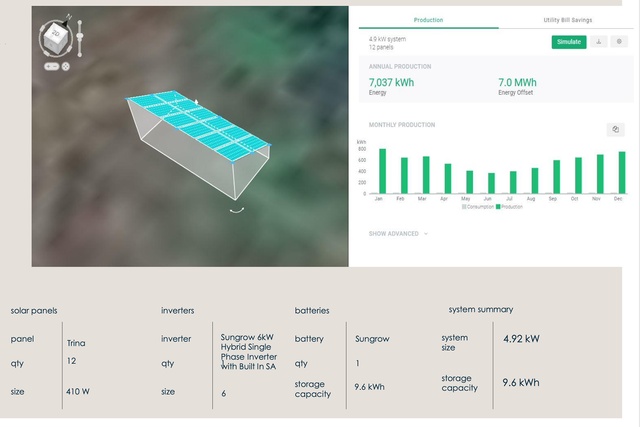
Our main aim for a solar system was resilience. As our power draw was low we didn’t feel it would make a massive financial difference, but we wanted to still have power during power cuts, so settled on a hybrid system with a battery. This would mean we would always have power, and still be able to sell any back we didn’t use. Our first quote from Lightforce included 12 panels, a 6kW hybrid inverter and a 9.6kW battery, and came to nearly $28,000 bringing us to the realisation that this wasn’t something we would be able to save up for any time soon.
Spread the cost
After some consideration and more at-length discussion with Aaron, we decided to get our solar in a staged approach, to spread the cost and make it achievable. This philosophy helped us achieve our Certified Passive House on less than a minimum-code budget, so surely it would work again. Lightforce works with several lending agents, one of which offers 24 months interest-free lending on large purchases with them, so we decided to explore this option.
We removed the battery and went with a standard inverter, so a panel-only system, reducing the cost to around $13,800, and worked out that if we put aside $140 a week into a high-interest savings account, in less than 24 months we would have enough to pay off the system before the interest-free period finished. In the meantime, the power generation would reduce our power bills to help mitigate the impact of the additional weekly cost, and this along with some careful budgeting, should enable us to cover the weekly payments. Alongside this Lightforce’s software showed that based on the generation, the initial investment for the system would be paid off in about seven years — far less than our initial estimates.
So, we signed on the dotted line, and with had a size and location, we could assess the compliance requirements, and I could get to designing and building the ground mount. We’d already elected to do it ourselves to save money. I’ve been told before that ‘architects don’t like to get their hands dirty’, but that definitely isn’t true with this architect!
Compliance and installation
For compliance there is some good guidance on the Building Performance website*. As our system didn’t impact the height of the house, and wasn’t within a boundary setback, we didn’t require a resource consent. Regarding building consent, our array had to meet several requirements:
- Under the maximum 40m2 in a rural zone
- Must have multiple supports on the ground (i.e. not on a single post)
- Not in a wind zone that exceeded ‘high’
- No more than 4m from the ground
- More than 5m from the property
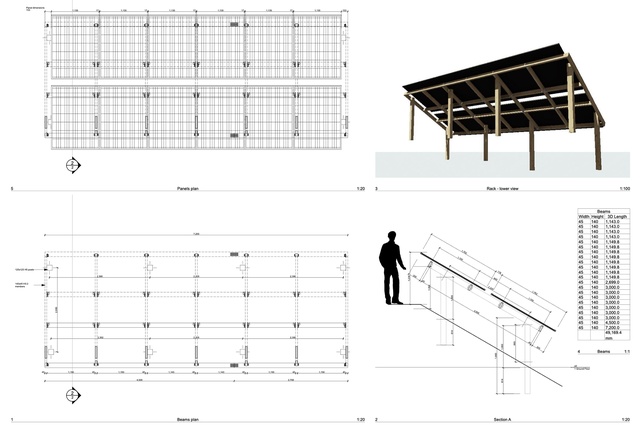
I designed the rack to meet these requirements, then to qualify for the exemption engaged a Chartered Engineer at Prendos to review the design. Of course the engineer immediately doubled the amount and sizes for the timber I’d specified, but I took his word for it and set about getting the rack built.
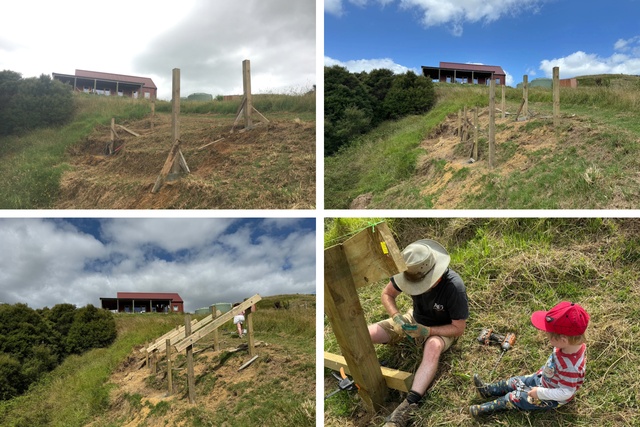
The process involved drilling eight holes with a hand-held auger, concreting in 8x 125x125 H5 posts, then, once they had set, installing the 190x45 rack framing with joist hangers, bolts and screws, before finally installing angled bracing members to keep the whole structure together. The whole family chipped in and the rack was completed over five full-on weekends.
After realising the spade was unrealistic in our sun-dried clay soil we rented a trencher, but after one broke on the job, and the replacement just didn’t work, we managed to find a local with a digger to dig the 30m, 600mm deep trench from the house to the rack just in time for the install to happen.
The Lightforce team installed the panels without an issue despite the pouring rain, and mounted the inverter inside the laundry. The suspended timber floor and exposed plywood linings again came up Milhouse, as instead of having to deal with a concrete slab or put holes in the wall, the cables could instead go under the house and come up through the interior wall framing, and a sheet of plywood was removed and replaced on the wall with no damage to finishes or weather-tightness issues, no repainting, and the hole in the subfloor was resealed with Pro Clima Extora tape around the new penetration to maintain an airtight envelope.
Power suppliers and rates
When considering who to go with for power, there are seemingly endless options for suppliers, and for their packages and rates. For years we had been with Genesis with no complaints, however now we were able to sell energy back to the grid we wanted to explore our options.
On top of the rate per kWh of power used, everyone pays a daily rate for power use, and this is increasing. With the reduction in the use of fossil fuels, and the increase in electrification with electric cars, heat pumps, etc as well as a general increase in demand, the electricity grid in New Zealand requires essential upgrades to meet the future requirements. These changes are being funded in part by the removal of low fixed charges, and by increasing the daily rate by 0.30c a year for the next five years — by April 2026 power will cost $1.80/day plus the cost for the amount of power used, up from the 0.60c a day currently, and the kWh rates will also be changing alongside.
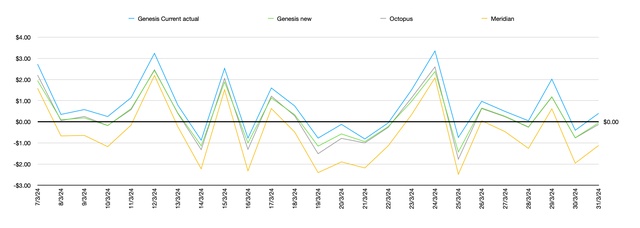
While waiting for the panels I had let Genesis know that we would be getting solar and were exploring options, and they provided a retention offer of rates and a 0.12c buyback for any power generated. Two other options I considered were Octopus, which had the same buyback rate but offered peak, off-peak and night rates; and Meridian which offered a buyback rate of 0.17c, and lower rates for power used.
After plotting a month’s worth of power use against each set of rates, along with the time we used most of our power, every time Meridian came out on top, plus they fixed the daily rate, buyback rate and purchase rate for five years, locking in certainty in a changing market. Once the data was clear it was a bit of a no-brainer, and we moved.
In use
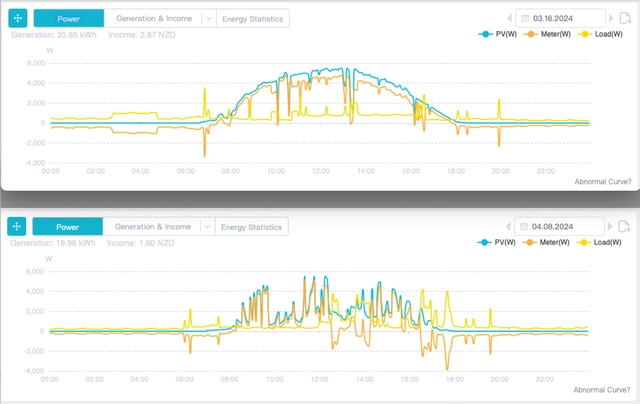
Since the install, we have been monitoring the generation via an online portal. During the first few days I was messaging my wife things like “did you just put the kettle on?,” “is that how much the hob uses?” etc., etc. But once the excitement settled down, the learnings have had a lasting impact on how we use power at home.
We both work from home on alternate days, but we also start early to get the kids ready and beat the Auckland traffic in the morning. This means we shower and make breakfast before the sun comes up, and as we have no battery, we have to buy power from the grid for these.
Similarly in the evenings we aren’t all home until around 6 pm, so any cooking and baths again happen when the sun is gone this time of year. The impact of this is that the person at home makes the most of our free power during the day — getting the washing done at lunchtime, cooking dinner in a slow-cooker, and generally try to make use of the power of the sun.
It also makes you realise how much power some things use — the kettle is surprising! Even our WWK302 hot water heat pump, while around three times more efficient than a standard electrical hot water cylinder, still uses a large percentage of our power throughout the day, as it ticks over throughout the night. The product does have the ability to ‘overheat’ the water while the power is free though to reduce the power use overnight, so we’re going to sort this soon.
Any power we don’t use during the day is sold back to the grid, and the 17c/kWh buy back rate is the best in the market; but when you take into account that we’re buying power for 29.79c/kWh, nearly twice as much, it makes far more sense to use it than sell it.
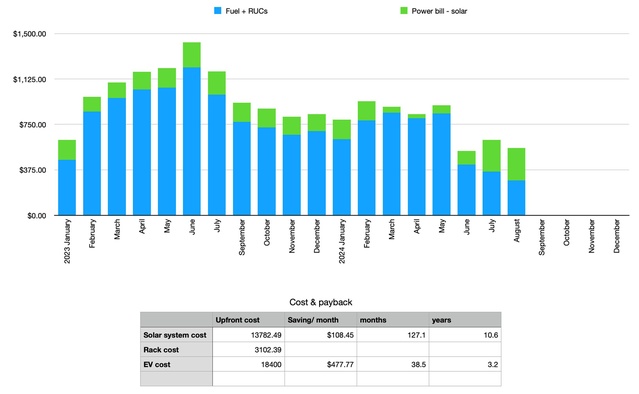
We’ve now had the solar panels installed for over six months. For the first three months our power bills went from an average of $150/ month, down to around $50/ month (this was over autumn and approaching winter, so the system wasn’t even at peak generation). In June, disaster hit — we had been running two 20+ year old ICE cars, but one of them came back from the garage in terminal condition, so we had to replace it. After some thought, we decided to make use of the 1% Green Home Top Up loan currently offered by our bank, and used it to purchase an EV to make use of the ‘free’ power we were generating.
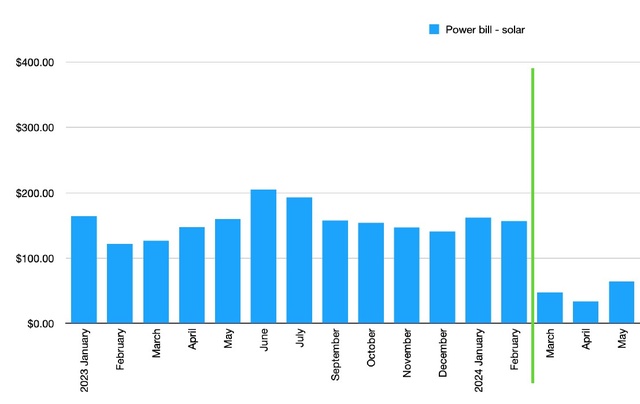
At first the impact seemed significant — we had to charge the car overnight during the week when we weren’t generating power, and our nice low power bills shot up to over $200 a month! But then I looked back at our historic fuel usage. Due to our 90km daily commute, we had been spending over $830/ month on petrol, but since getting the EV our average fuel plus RUCs spending has been only $356/ month. Once you combine the power bill with the car running bills, we’re actually saving around $420/ month — and this is in winter, the worst time for generation — a definite win!
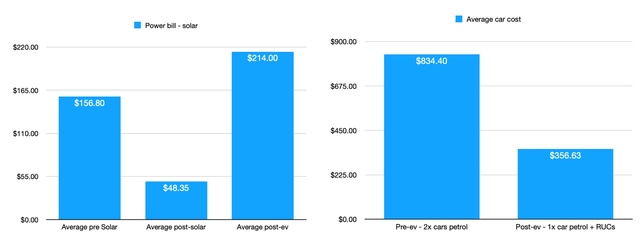

Upfront cost is so often the issue in adopting renewable energy technology, but we managed to mitigate this by looking at alternative funding strategies, and by focussing on what could be done now, and what could be done later. The EV is on a 1% loan for three years, the solar system is on a two-year interest-free loan, and for both, we’re putting the money we are saving away to gain interest, and to pay off both at the end of their low-interest periods. The savings from the EV mean it should payback in just over three years. With the solar system, the payback is currently at 10.6 years, however, this doesn’t take into account summer, when the generation and payback will be much higher.
The future

The original intention of the system was to provide resilience during power cuts, however, due to budget constraints we couldn’t afford the battery, so we haven’t yet achieved this aim. With the methodology we’ve opted for, we have still managed to take the first step towards the goal, and have the onsite generation installed and working, with minimal outlay and a manageable payback. Once the system is paid off in under two years, we will then be in a position to do the same with a battery, however, with the speed the solar industry is moving, by that point will we even need a battery in the house?
With new technologies being released, bidirectional charging is already being used in other countries and is slated to arrive in New Zealand as soon as next year. With these systems, the battery in the electric vehicle will charge with free power from the solar during the day, then will be able to power the house when the sun goes down, removing the additional cost and requirement for a battery in the house itself. We’d be doing more with less, making the absolute most of the free power from the sun, and adding even more value to the addition of the solar system to our home.
Closing thoughts
- As shown in a recent report from Rewiring New Zealand, electrification is here, and it will most likely save you money; so start the journey now!
- While solar panels have had high embodied carbon, this is dropping fast, and the benefits in use may balance this out.
- The panels have a 30-year power warranty which will more than outlast the initial outlay, and they are increasingly recyclable.
- While you can install solar on pretty much any dwelling, the less energy efficient it is the larger the array you will need, and the more it will cost.
- Due to the high level of energy efficiency of our house through Passive House Certification and Homestar rating, a smaller solar system was more than sufficient, reducing the upfront cost.
- I did originally consider a movable mount, to enable me to tilt the panels for the best winter and summer generation, but the construction was proving a bit too complex at the time to avoid flexing, etc. Another option could have been to tilt the panels steeper, to prioritise the winter generation when we need more, over the summer when we need less.
- If there isn’t a direct bus to where you want to go, don’t let that stop you from taking one that will get you closer, rather than knocking the idea of solar on the heat, we worked out another way to get us towards our goal.
- The ground mount was an added cost — and double what we’d originally priced prior to the engineering — but this wouldn’t be needed if roof-mounted.
The numbers
Ground mount rack materials cost including digger: $3,102
5.1kW 12x 430W bi-facial panels + 5kW inverter: $13,800
Generation so far (8 March to 9 October): 3764kWh
Consumption so far (8 March to 9 October): 5521kWh
Power used in house: 1305kWh
Power bought from the grid: 4199kWh

A note from the writer, Joe Lyth:
I don’t work for, nor have I received any incentives or otherwise from any of the companies mentioned. My sole purpose in writing this is to share my experience and journey.
For more information contact Joe Lyth at WEL Architecture.
Listen to an interview of Joe Lyth by Matthew Cutler-Welsh for Home Style Green, on the Passive House Podcast (Episode #253) here.